Integrating NSX-V and NSX-T backed workloads Using VeloCloud SD-WAN Solution

In my previous blog , I talked about the Fundamentals of  VMware SD-WAN technology by VeloCloud focusing on its architecture and use cases.
In this blog, I will be discussing the design I used to connect NSX backed workloads across different Sites/Branches and Clouds using the VMware VeloCloud SD-WAN technology.

My setup consists of the following:

1. NSX-v lab living on Site A. It is backed by a vCenter, management and compute ESXI clusters. Workloads are Virtual Machines.
2. NSX-T lab, that is backed by a management and compute ESXI cluster in addition to a KVM cluster. Workloads are VMs along with Kurbenetes (K8) containers.
3. VMware Cloud on AWS SDDC instance with VC/ESXI/VMs.
Because the SD-WAN technology is agnostic of the technology running in the Data Centers, you can add any cloud/Datacenter/Branch to the above mentioned list such as AWS native EC2s/ Azure/ GCP/ Baba or simply any private/public cloud workloads.
Also note that NSX DataCenter is not a prerequisite to connect sites/branches using SD-WAN by VeloCloud.

The Architectural Design of the end Solution:

velo_design


The above design is showcasing a small portion of the full picture design where I can connect “n” number of Sites/Branches/Clouds using SD-WAN technology.
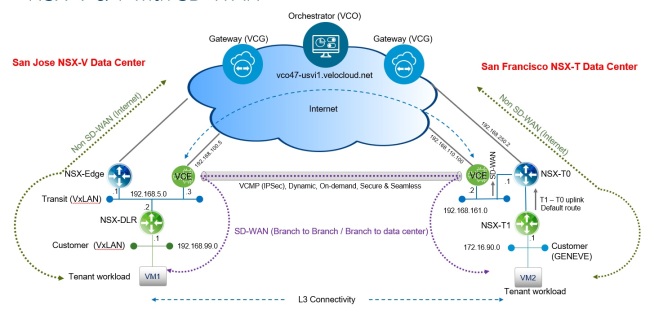
I started by connecting my site 1 in San Jose which happens to be backed by NSX-V with my other DC located in San-Fran backed by NSX-T.
Traffic egressing to the Internet/Non SD-WAN Traffic (Green) will go via the NSX ESG in case of NSX-V site and via the Tier-0 in case of the NSX-T site.
Branch to Branch traffic (in Purple) will ingress/egress via the VeloCloud Edge VCE on each site.

NSX-V Site:

In the San Jose site, I Peered the NSX-V ESG with the VCE using e-BGP. I also already had  i-BGP neighborshop between the NSX DLR and ESG. The transit boundary in Blue you see in the image below is established by deploying an NSX logical switch attached to NSX-V ESG , NSX-V DLR and the VCE.
I redistributed routes learned via ibgp on the ESG to the VCE router using the ebgp.
Now the VCE_SanJose knows about the subnets/workloads that are residing south of the DLR.
I filtered the default originate that the ESG learned from its upstream from being distributed to VCE_SanJose as I dont want to advertise my default originate (default route) to other Branches/sites/Clouds.

Low level design on the NSX-V Site:


velo_design_2

Based on the above,

Internet/Non-SD-WAN traffic path will be as follows

VM1–>DLR–>ESG–> Inernet/VLAN

SD-WAN traffic  path :

VM1–>DLR–>VCE–> Internet. (Note that the VCE could have multiple ISP Links or MPLS links that will leverage the Dynamic Multipath Protocol Optimization known as DMPO).

VCE will build tunnels to a VMware VeloCloud hosted Gateways (VCGs) and to the Orchestrator (VCO).  VeloCloud Gateways will be the VCEs distributed control plane and hence VCEs will learn about all other branches routes via the updates those VCGs send over. (refer to Image 1 to help you understand the path).


Now that we are done configuring the San Jose site, lets go and Configure the San Francisco NSX-T data center.


NSX-T Site:

A new Tier-0 uplink will be connected to an NSX-T Geneve Logical Switch. This Transit logical switch will also be connected to one of the VCE’s interfaces as Downlink.

On the NSX-T Tier-0 and VCE, we will build an e-BGP neighborship via the transit Logical Switch created. VCE will hence know about the routes being advertised from the Tier-0.

Note in NSX-T, Tier-1 Auto plumb all routes towards the Tier-0.

Now that the VCE knows about the San Francisco Routes, it will advertise them to the VCG that is again hosted somewhere on the internet by VMware VeloCloud.

Low level design on the NSX-T Site:


velo_design_3


Internet/Non-SD-WAN traffic path will be as follows:

VM1–>Tier-1–>Tier-0–> Inernet/VLAN

SD-WAN traffic path :

VM1–>Tier1–>Tier-0–> VCE–> Internet.

Note that the VCE could have multiple ISP Links or MPLS links that will leverage the Dynamic Multipath Protocol Optimization known as DMPO.


VCE will build tunnels to a VMware VeloCloud hosted Gateways (VCGs) and to the Orchestrator (VCO). Gateways will be the VCEs control plane and hence VCEs will learn about all other branches routes via the VCG.


Now San Jose and San Francisco workloads know how to reach each other via  SD-WAN.


Summary


The magic of SD-WAN is that we can add “n” number of sites with or without  NSX and  connect them via L3 seamlessly. For instance, I can connect 50 branches to those 2 DCs by deploying a VCE on each branch.

We can also use the DMPO technology to improve the Quality of Service of the traffic destined to branches. Business policies can also be enforced using the VCE.


VMware SD-WAN by VeloCloud 101

VMware recently acquired VeloCloud which is a company specialized in SD-WAN technology and added it under its NSX umbrella offering.

In this Introductory blog, I will be talking more about the fundamentals of the VMware SD-WAN By VeloCloud focusing on Architecture and Use Cases.

What is SD-WAN?


SD-WAN enables enterprises to support application growth, network agility and simplified branch implementations while delivering optimized access to cloud services, private data centers and enterprise applications simultaneously over both ordinary broadband Internet and private links. Think about SD-WAN as the onion routing that connects Enterprise DC to Branches and Private/Public Clouds.

velo_1


Use Cases:

1. Managing and scaling Connectivity of workloads on any Cloud:

Just like any SD-WAN technology, the main use case would be connecting workloads across any clouds whether private and/or public  with the ability to scale and connect in the minutes. The Orchestration also provides offers recognition and classification of 2,500+ applications and sub applications without the need to deploy separate hardware or software probes within each branch location. The solution intelligently learns applications as they are seen on the network and adds them to the VMware SD-WAN cloud-based application database. Services such as firewall, intelligent multipath, and Smart QoS may be controlled through the solution’s application-aware business policy control.


2. Zero-Touch Provisioning

A huge differentiator for Velo Cloud from other competitors is their Zero-touch branch deployments. VMware SD-WAN Edge appliances automatically authenticate, connect, and receive configuration instructions once they are connected to the Internet in a zero-touch deployment.


3. Dynamic Path Selection

Dynamic Multipath Optimization comprises of automatic link monitoring, auto-detection of Internet Service Provider and auto-configuration of link characteristics, routing and QOS settings.

This means that you could dedicate traffic of a certain high priority application via an available ISP , while perhaps traffic of low priority applications will be routed to ISP2. Think of a case where you have 2 links from 2 different ISPs with one having a higher Bandwidth.


4. Link Steering and Remediation

This is another VeloCloud differentiator where an admin can do on-demand Per-packet link steering based on the measured performance metric, intelligent application learning, business priority of the application, and link cost to improve application availability. Remediates link degradation through forward error correction, activating jitter buffering and synthetic packet production.

This will be extremely beneficial for very sensitive applications (say video conferencing) where same packet will be duplicated across all available ISPs/MPLS links on the sender site while the destined site will simply reassemble the packet flow from all circuits available improving performance irrespective of jitter and drops on a given ISP link.


velo_linksteering


5. Cloud VPN (VeloCloud sites to non VeloCloud Site connectivity)

One-click site-to-site cloud VPN is a VPNC-compliant IPSec VPN to connect VMware SD-WAN and non-VMware SD-WAN sites while delivering real-time status and health of VPN sites. Establish dynamic edge-to-edge communication for all types of branches based on service level objectives and application performance.

6. Security

Stateful and context-aware (application, user, device) integrated next generation firewall delivers granular control of micro-applications, support for protocol-hopping applications, such as Skype and other peer-to-peer applications (e.g., disable Skype video and chat, but allow Skype audio). The secure firewall service is user- and device OS-aware with the ability to segregate voice, video, data, and compliance traffic. Policies for BYOD devices (Apple iOS, Android, Windows, MAC OS, etc.) on the corporate network are easily controlled.

7. Deep Packet Inspection

Granular classification of 2,500+ applications enables smart control. Out-of-the-box defaults set the Quality of Service (QoS) policies for common business objectives with IT required only to establish traffic priority. Knowledge of application profile enables automation of QoS configurations and bandwidth allocations.


What are the layers of VeloCloud SD-WAN:


VeloCloud Technology is based on 3 Core layers: Management layer for Orchestration, a Control Plane Distributed Gateways and Data Plane on-premises Edges.

layers

 VeloCloud Orchestrator (VCO):

A multi-tenant Orchestrator which provides centralized enterprise-wide installation, configuration and real-time monitoring in addition to orchestrating the data flow through the cloud network. The VCO enables one-click provisioning of virtual services in the branch, the cloud, or the enterprise datacenter.


VeloCloud Gateways (VCG): 

This layer constitutes of  distributed network of service gateways deployed at top tier cloud datacenters around the world, providing scalability, redundancy and on-demand flexibility.

VCGs provide optimized data paths to all applications, branches and datacenters along with the ability to deliver network services from the cloud.

They are typically considered a distributed Control Plane that can optionally participate in the data-plane.


VeloCloud Edge (VCE):

A Zero-touch enterprise-class appliances that provide secure optimized connectivity to private, public and hybrid applications, compute and virtualized services. VCEs perform deep application recognition, application and packet steering, performance metrics and end to end quality of service in addition to hosting virtual network function (VNF) services.

They can be deployed as Hardware appliance or a Virtual Appliance running on an OVA Virtual Machine.


Conclusion:


SD-WAN is the next Generation MPLS networking for Enterprise and Cloud Providers. It resembles the vision of connecting any cloud any workload anywhere in minimum configuration making scaling branches a smooth and flawless process.

The technology allows Links remediation and packet steering to achieve highest Quality of Service.


vCD Cross VDC with Cross VC NSX design Failure & High Availability Scenarios Deep Dive

2ndd


In this blog I will be deep diving into the vCD NSX design that Daniel and I are proposing focusing on the packet life during Failures showcasing the High Availability that we will get.

This is a continuation of the blog post  where we deep dived into the use cases and the high level design of cross VC NSX and cross VDC vCloud Director instances.


Scenario 1: All components are up and running


Pepsi workloads will have their respective Tenant_Pepsi UDLR as their Default gateway.


East/West Traffic:

Pepsi workloads that are communicating L2 East/West whether in the same Site or across Sites will use the stretched L2 logical switch and communicate successfully via Host VTEP encapsulation. If its an L3 communication between Workloads, then Tenant UDLR will do the routing on the source host and encapsulate the packet again via the VTEP to the destined workload via its host VTEP.

North/South Traffic:

Traffic originating from Pepsi Workloads whether they live on ORGVDC site 1 and/or ORGVDC site 2 will have to egress from the Active ORGVDC-A_Pepsi Edge Services Gateway. Tenant UDLR has a BGP neighbor-ship with both the Active Tenant ESG and the standby ESG with higher weight for the Active Tenant-ESG.

From the Active Tenant-ESG, traffic will egress to the Provider ECMP ESGs (E1 to E4 Green)  Due to the fact that the Provider UDLR has local egress (Active/Active) being configured in the  Provider NSX layer.

The Provider Primary UDLR Control VM is peering BGP with ECMP E1 to E4 Green on site 1 with weight 60 whereas with BGP weight 30 with ECMP E5 to E8 Green on site 2.

The Provider Secondary UDLR Control VM is peering BGP with ECMP E1 to E4 Blue on site 2 with weight 60 whereas with BGP weight 30 with ECMP E5 to E8 Blue on site 1.

This is shown demonstrated in the diagram below for Tenant Pepsi that has an active Tenant-ESG  on site 1 and passive Tenant-ESG on Site 2.

scenario1a


Where as for Coke, It has an active Tenant ESG on site 2 and a passive Tenant ESG on site-1. Hence traffic will egress from Site 2 Provider ESGs ( E1 to E4 Blue) again due to the fact of local Egress being configured at the Provider NSX layer.

Scenario1b


Note that due to the active/passive mode on the Tenant Layer, we maintained the state-full services that the Tenant ESG provisions such as NATing/Fwing/LB/DHCP etc..

Always remember that UDLR control VM is not in the data path as the UDLR is an instance present on every host.

Moreover, notice how we distributed traffic on both sites leveraging maximum resources.

Scenario 2 : We lose the Tenant’s Active ESG

We lose the Active ESG on site 1 for Pepsi.

Scenario2


BGP weight kicks in as now the Previously “Standby” ESG will become active and hence traffic will egress from the Tenant-ESG on Site 2 (OrgVDC-B-Pepsi) and hence traffic will Egress from E1 to E4 Blue.

The same above scenario will happen with Tenant-Coke if Coke loses its Active ESG on Site 2.

Scenario2b


Scenario 3 : We lose the upstream Physical Switches on Site-1


Scenario 3a


If I lose my physical switches upstream, or technically the default originate, Traffic will will still egress from Active Tenant ESG on Site 1 and the Provider UDLR will send the traffic to egress from E5 to E8 Green on site 2 as now and due to BGP weights kicking in, default originate is coming from those Edges on site 2. Hence all internet traffic will be accessible from site 2.

Coke traffic (who has their active Tenant-ESG on site 2) are egressing normally from on E1 to E4 Blue on site 2(Refer to Scenario 1).


Same case will happen if I lose Internet on site 2 where now traffic for active Tenant-ESGs on site 2 will egress from the E5 to E8 Blue while Active Tenant ESGs on site 1 will still egress from E1 to E4 green.

Scenario3b


In Summary, this design is an optional design that a Cloud Provider can adopt.

It does showcase the resiliency and High availability while leveraging ECMP to egress north to the physical infrastructure. Its also a great way to detect failure northbound and traffic engineer a workaround this failure to egress from the healthy site.


vCloud Director Cross-VDC Design with Cross VC NSX


With the release of VMware vCloud Director 9.5, which is packed with a lot of great new features, one of the significant additions is the introduction of Cross-VDC networking.

In prior vCD releases, Cloud Providers couldn’t use the universal constructs that NSX introduced in the NSX cross VC architecture and could not benefit from the use cases that cross VC NSX targets and solve.

Compatibility with Cross VC NSX is finally there starting vCD 9.5+ as vCD  now supports the universal constructs that NSX creates. This is great news for Cloud Providers who are looking to target those use cases.

In this blog I will address the use cases of leveraging cross-VC NSX inside a vCD Virtual Data Center (VDC) and what design We are proposing to integrate with NSX.

This blog was a joint activity between my SE peer Daniel Paluszek and vCD engineering staff  Abhinav Mishra.


What are the use cases of stretching the network across VCs/Sites?


  1. Resource Pooling: ResourcePoolLogical networking and security across multiple vCenters allow for the ability to access and pool resources form multiple vCenter domains. Resources are no longer isolated based on vCenter and/or vCD boundaries which hence allows the ability to access and pool resources form multiple vCenter domains achieving better utilization and less idle hosts.
  2. Workload Mobility


workload mobility


Since logical networking can span multiple vCenter domains and multiple sites:

  • Cross-VC NSX allows for enhanced workload mobility across Active-Active data centers
  • Workloads can now be moved between vCenter domains/sites/Org VDCs on demand. A practical use case example would be when there is a data center migration/upgrade activity.


3. Disaster Recovery


Blog1st


Cross VDC will help tenants and providers to continue operations in case of a partial or complete network failure. Workloads on Site-A can leverage the Tenant-X-Org-VDC edge on Site-B in the case where the Tenant-X-Org-VDC Edge fails on Site-A.

Moreover, during Internet failure on Site-A, All tenants workloads on site-A will use the Provider Edges on Site-B to exit to internet provided on site-B.


High Level Design Architecture for vCD 9.5+ and NSX


2ndd


The goal of this high-level design is to provide optimal availability of network services from the Provider and Tenant layer. We must adhere to Cross-vCenter NSX best practices, so do note that we are presuming you are aware with these guidance parameters stated here: NSX Cross VC Design Guide

In this suggested design, we have two layers of NSX:

  1. Tenant layer within vCloud Director (auto provisioned by vCD)
  2. Provider Managed layer ( provisioned natively in NSX)


The goal is to provide high availability between the two sites while meeting the stated requirements of Cross-VDC networking.


First NSX layer (Tenant Layer): This layer is the one that is controlled and provisioned by vCD . vCD will extend the tenant networks across sites via stretching their respective logical switches (Universal Logical Switches).The Tenant Universal Distributed Logical Router (UDLR) will be auto provisioned by vCD and will do the required routing for the tenant’s workloads residing on different L2 domains. The tenant’s Active Edge Services Gateway (ESG) or Tenant-<X>-OrgVDC-Site-A will terminate all tenant services such as NAT/FW/DHCP/VPN/LB and will essentially be the North/South entry/exit point for workloads residing in the tenant’s respective OrgVDC on each site.


Tenant layer


We are suggesting that we deploy the Tenant UDLR in Active/Standby(passive) mode where all Tenant A workload traffic whether they are on Site-A or Site-B will egress from
Tenant-A-OrgVDC-Site-A  Edge.

The rationale behind Active/Standby mode is to maintain stateful services that are running on the tenant’s ESG and explicit control of the ingress traffic which will also assist in any failure considerations. (More details on fail-over scenarios in my next blog)


Tenant-B will have a flipped A/S design, where I will have Site A as the passive/(standby) while Site B will be Active for Tenant B workloads.


tenant2


Tenant B workload traffic whether they are on Site-A or Site-B will egress from
Tenant-B-OrgVDC-Site-B  Edge.

Making different tenants active on different sites will help us distribute network traffic across sites and thus benefit from resource pooling and utilization from the available Data Centers.


2nd NSX Layer (Provider Layer):  This layer is the Provider Controlled NSX Layer and will be configured/managed by native NSX outside/North of vCD.


3rddd


Each Tenant ESGs (Tenant-X-Org-VDC-Edge) will peer externally on a ULS with the       pre-Provisioned provider UDLR. This transit interface will be on VXLAN or in other words nothing but another pre-provisioned Universal Logical Switch/tenant. That way we can scale up to 1000 tenants as UDLR supports up to 1000 Logical interfaces (Lifs).

In this high-level design, we will be utilizing an Active/Active state with local egress mode at the Provider Layer (Provider UDLR). Therefore, local traffic will egress at its respective local site. With this configuration, a UDLR Control VM will be deployed on each site.

We are also suggesting that we enable ECMP on the Provider UDLR and Peer with up to 8 ESGs spread equally across sites.

Site-A Provider Primary Control VM will peer with ESG 1-4 Green on site 1 with higher BGP weight along with ESGs 5 to 8 Green on site 2 having lower BGP weights. This will be an achievable step as E1-E8 Green will connect to the same stretched Universal Logical Switch.

Similarly, Provider Secondary Control VM on Site 2 will peer with up to 8 ESGs. ESGs 1 to 4 Blue on site 2 will have higher BGP weight when peering with the Secondary Control VM while ESGs 5 to 8 Blue on site 1 will peer with lower BGP weight.


Provider UDLR will reach the Tenant’s ESGs uplinks via directly connected routes.This is where Public IPs will be floating. No need to have any kind of static/dynamic routes between the Provider UDLR  and the Tenant ESGs. Reason is that Provider UDLR will advertise directly connected routes to the Provider Edges upstream via the BGP adjacency that has been already formed while Tenant ESG will simply NAT the public IPs to the workloads that need to be published.


Note: For high availability, the default originate would be advertised to the Provider ESGs from the upstream physical network. This will help in the fail-over to the secondary site when upstream internet switches are down.


Big thank you to my peer Yannick Meillier who inspired me on peering the Provider UDLR control VMs with a set of Provider ESGs spread across sites to achieve high availability in case of upstream failure in any given site.


In my next blog, I discussed in depth the packet life of the above design along with failure and fail-over scenarios.


Security Compliance – Pre-configure your vApp firewall rules inside vCloud Director using NSX DFW (Part 2 of 2)

This is a joint blog series with Daniel Paluszek .

We will be discussing  how to achieve security compliance inside vCloud Director’s  future workloads  by pre-configuring native NSX DFW rules.

The use-case came from a new cloud provider that wants to deploy a specific vApp when they onboard a new tenant (or organization). This specific vApp will need to have NSX Distributed Firewall rules in place – the vApp will be the same for every tenant and will need to be secured accordingly and hence achieve compliance.


Daniel discussed a great method of creating an NSX security group with Dynamic Membership and that uses VM name as the dynamic construct.The caveat in that is the Provider/Tenant MUST create the vApps with names that match the dynamic membership created natively in NSX.


My method would be based on using the Resource Pool ORG-ID  instead of the VM name as the construct used in my dynamic membership criteria with the Caveat that the Provider will have to add each ORG that needs such compliance to this security group.

Tenants can pick any name for their workloads vApps/VMs and still comply with the Firewall rules that are pre-enforced.


Overall Steps:

  1. Creation of a Security Group with Dynamic Membership
  2. Creation of a Security Policy
  3. Activating Security Policy against Security Group
  4. Creating vApp that meets dynamic membership criteria


Creation of a Security Group with Dynamic Membership

  1. Navigate to Menu -> Networking and Security -> Service Composer
  2. The first thing we are going to do is create a Security Group that will associate the dynamic membership based on entity criteria.


3. We want to apply this group to any VM inside the Org vDC. For that, we will be using Resource Pool Org-ID entity in the dynamic membership criteria.

ORG-IDs are generated for each Org vDC inside vCD. We can be import them as a VC object inside Dynamic Security Group Membership by using the “Resource Pool” as an entity . Hence, the Org vDC should pre-exist in order to pre-configure the native Firewall rules to achieve the compliance needed or we can simply add the newly created ones to the same security group on day 2.


Note that you will have to include every Org vDC you create/created that will need this kind of security compliance. 


resource poolRP2


4. Click Finish, and we are off to the next step.


Creation of a Security Policy

  1. Let’s click on the Security Policies tab inside of Service Composer and create a new Security Policy –

2.  give it a name – We are using Standard vApp DFW Rules. 

3. From here, we can click on Firewall Rules and create our rules. In our example, We are going to let HTTPS traffic in and block everything else. Typically, for micro-seg rules, we would create granular rules to secure all types of traffic. We are using these just as an example.

4. Creating DFW policies is fairly straightforward in the Service Composer –

Activating Security Policy against Security Group

  1. Now, we are ready to apply our newly created policy to our group. Click the Apply button while your newly created policy is selected – 
  2. From the pop-up window, we will select our Standard vApp Rule group as a Selected Object – 
  3. Success – now we can see it has been applied – 
  4. From the DFW view, we can see a new section created with associated DFW rules – 


No need to go through specifics of creating the vAPP that meets criteria as all vAPPs/VMs that are part of the pre-provisioned Org ID will automatically have the security compliance. However, take note that you will need to add each ORG-VDC’s resource pool into that policy to achieve compliance.


While this is not the only path of securing Provider-managed VM’s for a tenant. Check out Daniel’s bog post for his approach!

What is the Virtual Any Cloud Network?

The Virtual Any Cloud Network Vision


1stp

The network of the future is software-defined. A Virtual Cloud Network, built on VMware NSX technology, is a software layer from on-prem data center to any cloud, any branch and any infrastructure.

VMware NSX is the foundation of the Virtual Cloud Network which consists of : NSX Data Center, NSX Cloud, App Defense , NSX SD-WAN by VeloCloud and NSX Hybrid Connect.


In this blog, I will be focusing on NSX Cloud piece of it to demonstrate its key features and benefits.


NSX Cloud


NSX Cloud is a secure, consistent foundation that makes managing the networking and security of your workloads living literally on any cloud which includes your on-prem  private cloud and/or the hyper-scale public clouds (AWS, Azure and GCP).

It solves challenges Cloud Architects face when dealing with public clouds which include Lack of real-time visibility in cloud traffic flows, security policy consistency across hybrid clouds, compliance to enterprise security policies and leveraging existing operational tools.

It also adds a new line of revenue for Cloud Service Providers where NSX Cloud can be utilized to offer managed security services for their tenants’ workloads living on any cloud.


So What Are The Benefits of NSX Cloud in The Virtual Cloud Network?

1. Consistent Security For Apps Running On Any Cloud:

The main benefit in my opinion when utilizing NSX Cloud is the ability to enforce your Firewall security rules from your on-prem NSX Manager to workloads living on-premise and/or Azure and/or AWS and/or Google Cloud Platform using the same firewall rule applied across all clouds.

NSX Cloud brings networking and security capabilities to endpoints across multiple clouds. By integrating with NSX Data Center (deployed on-premises), it enables networking and security management across clouds and data center sites using the same NSX manager deployed on-prem.

Security policy is automatically applied and enforced based on instance attributes and user-defined tags. Policies automatically follow instances when they are moved within and across clouds.​Dynamic Policies can based on

  • VM attributes in cloud – eg VNET ID, Region, Name, Resource Group, etc
  • Customer defined Cloud resource tags


NSX_Cloud_usecase1


Example:

A 3-tier application (Web VMs / App VMs/ DB VMs) consists of :

  • Multiple Web servers spread across multiple hyperscale clouds: AWS/Azure/GCP.  All of these servers will be tagged its respective native cloud tags: “Web”
  • App server is a kubernetes container living On-Premises and will be tagged with “App”
  • DB Server which consists of multiple VMs living On-Premises and will be tagged with “DB”

All of the above 3 tier app workloads will be tagged with a unique tag that will differentiate the application (in this case FE/APP/DB of website X). We will be using this tag to apply-to field in the DFW rules.

Webservers will need to to communicate with App servers living on AWS on port TCP 8443.

App containers would need to communicate with the DB servers on port MySQL TCP 3306.

Any should be able to communicate with the Web Servers on HTTPS TCP 443.
3 Firewall rules will be needed from the NSX Manager living on-prem that will enforce the above security posture using security tags constructs across ALL of the leveraged clouds.

usecase1


2. Manageability and Visibility Across All Public Clouds


From the NSX Cloud Service Manager “CSM”, you will have the option to add all your Public Cloud accounts (AWS/Azure/GCP).

Once you add all your public cloud accounts, you will be able to view all of the Accounts, Regions, VPCs/VNETs you own along with their respective workloads from the same User Interface. Think of its a single pane of glass across all accounts across Public Clouds.

NSX_CLOUD_Visibility

This will simplify the manageability of your workloads and save a lot of time in troubleshooting and capacity planning.


usecase2

3. Real Time Operation Monitoring With DFW Syslog and L3SPAN in Public Clouds


From an operational perspective, you want to make sure all these security groups that you have are active and on. Since the Firewall and Security policies are now managed via the NSX manager, we will have the option to use syslog which look very similar to the logs created by hypervisor.

You can collect the data and send it to your Syslog collector, say Splunk and you will be able to run Data Analysis off of it.

This will provide statistics on who are the VMs talking to , what ports are permitted/denied etc.


usecase3


Real Time Operations visibility can also be complimented by using the L3SPAN in public clouds per the below flow:

  • Enable NSX L3 SPAN/Mirror on a per Logical port or Logical switch basis using Port-mirroring Switching Profile
  • NSX Agent running inside the VM captures the traffic.
  • Mirrored traffic forwarded to IP destination (collector) within VPC using GRE


usecase3_2


4. Full Security Compliance with the Quarantine Option


You will have the option for full compliance for policy enforcement where the VMs that are created in the public cloud which are not managed by NSX will be quarantined.

This is done via the Multi-layered security which provides two independent security perimeters, primary security through NSX firewall, second layer of security through the native public cloud security groups which will be utilized by the NSX.

Note– This is optional. You can still have a dev environment that has both NSX managed and non managed workloads without enforcing the quarantine.


usecase4


Note: As of the publishing date of this blog, the NSX-T 2.2 GA version fully supports workloads on-prem and Azure.

The upcoming NSX-T Cloud versions will be supporting AWS and other public Clouds.

In Summary


The virtual any cloud network is the next generation of cloud Networking. Cloud Admins could now utilize NSX Cloud to have full visibility for cloud traffic flows while the Security admins will enforce  consistent security policies across all clouds.


Cloud Service Providers can utilize NSX Cloud to offer managed services for their tenant workloads anywhere, creating a new line of revenue.


In my next post, I will discuss the CSM in further details along with deep diving on the architecture of NSX Cloud.
 

8 Best Practices to Achieve Line-Rate Performance in NSX

Every Architect and administrator would love to achieve maximum throughput and hence achieve the optimum performance out of their overlay and underlay networks.

Often Line-rate throughput is the throughput that each Architect/admin would aim for their workloads to leverage. In this blog, I will be sharing the best practices that Architects/admins can follow in order to achieve maximum throughput resulting in optimum performance.


So what is line-rate?

Line rate is defined as the actual speed with which the bits are sent onto its corresponding wire (physical layer gross bit rate).

Line-rate or wire-speed means that the workloads (in our case a Virtual Machines) are  supposed to be able to push traffic at the link-speeds of their respective ESXI hosts physical NICs

Its important to note that the maximum achievable throughput will be limited to to the hypervisor’s Physical NIC  throughput along with the VM vNIC throughput (E1000/VMXNET3) irrespective of how massive is the throughput support on your underlay devices ( Switches/Firewalls).


Best Practices To Achieve Line-rate:


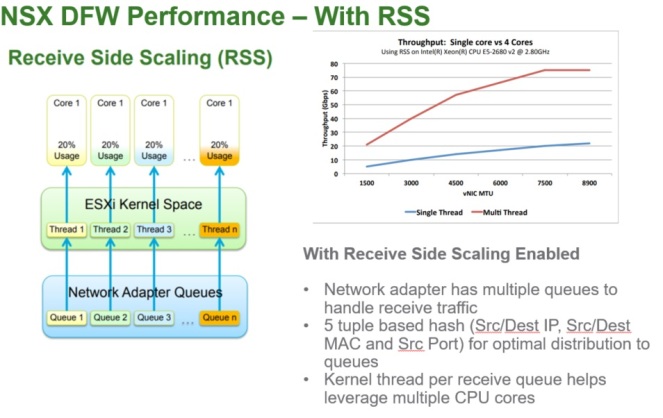
Best Practice 1: Enable RSS on ESXI hosts (prior to ESXI 6.5)

RSS (Receive Side Scaling) looks at the outer packet headers to make queuing decisions.  For traffic going between just two nodes – the only thing different in the out headers is the source port and hence this is not really optimal.

Note: Rx Filters, available since ESX 6.5 as a replacement to RSS, looks at the inner packet headers.  Hence, queuing is lot more balanced.

Like  RSS, NIC cards need to support Rx Filters in hardware and they should have a driver, for it to work. If available, Rx Filters are enabled by default. VMware is working on having Rx Filters listed on the I/O compatibility guide.


Without RSS


With RSS

Best Practice 2: Enable TSO


Using TSO (TCP Segmentation Offload) on the physical and virtual machine NICs improves the performance of ESX/ESXi hosts by reducing the CPU overhead for TCP/IP network operations. The host will use more CPU cycles to run applications.

If TSO is enabled on the transmission path, the NIC divides larger data chunks into TCP segments whereas if TSO is disabled, the CPU performs segmentation for TCP/IP.

TSO is enabled at the Physical NIC card. If you are using NSX, make sure to purchase NIC cards that have the capability of VXLAN TSO offload.

TSO


Best Practice 3: Enable LRO


Enabling LRO (Large Receive Offload) reassembles incoming network packets into larger buffers and transfers the resulting larger but fewer packets to the network stack of the host or virtual machine. The CPU has to process fewer packets when LRO is enabled which reduces its utilization for networking.

LRO is enabled at the Physical NIC card. If you are using NSX, make sure to purchase NIC cards that have the capability of VXLAN LRO offload.


LRO


Best Practice 4: Use multiple 40Gbps NIC Cards with multiple PCIe busses


The more NIC Bandwidth you will have the less bottlenecks you will create. Having multiple PCI-e busses will help  with higher maximum system bus throughput, lower I/O pin count and smaller physical footprint resulting in better performance.

40g

Best Practice 5: Use MTU 9000 in the underlay


To achieve maximum throughput (whether on traditional VLAN or VXLAN), having the underlay supporting 9K MTU jumbo frames will have a huge impact in enhancing the throughput. This is will be extremely beneficial when if the MTU on the VM itself has a corresponding 8900 MTU.


Best Practice 6: Purchase >= 128 GB physical Memory per host


This is a useful best practice for folks having NSX Distributed Firewall  (DFW) Configured. NSX DFW leverages 6 memory heaps for vSIP (VMware Internetworking Service Insertion Platform) where each of those heaps can saturate more efficiently with more physical Memory available to the host.

Note below that each hip uses a specific filter part of the DFW functionality.

  • Heap 1 : Filters
  • Heap 2 : States
  • Heap 3 : Rules & Address Sets
  • Heap 4 : Discovered Ips
  • Heap 5 : Drop flows
  • Heap 6: Attributes

FW heap


Best Practice 7: Follow NSX maximum Guidelines

A good best practice is definitely following the maximum tested guidelines.

These guidelines are now publically published by VMware and you can find them via the below link:

NSX_Configuration_Maximums_64.pdf

Maximums


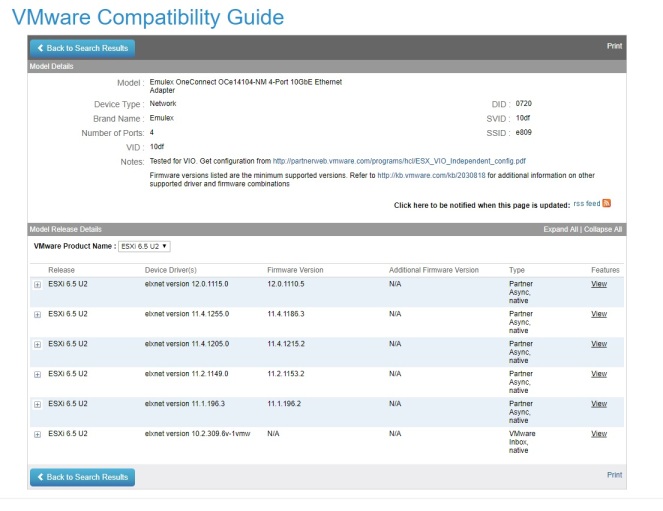
Best Practice 8: Compatibility Matrix


Make sure to check the VMware compatibility matrix for supported NICs:

https://www.vmware.com/resources/compatibility/search.php?deviceCategory=io

The driver and firmware versions should be on the latest release and the recipe should match.

Compatibility

You Can also pick the NICs that support VXLAN offload features ( TSO/LRO) using that matrix.


In Summary:

Here is a summary of the best practices that need to be followed in order to achieve line rate performance within a vSphere environment running NSX:

summary


Fixed- vCloud Director 8.20 IPsec Tunnel issues after upgrading to NSX 6.3.x from prior NSX versions

Blog2_3

Some SPs reported losing IPSEC tunnels on their vCD edges after upgrading from NSX 6.2.X to NSX 6.3.x+ with the below error:

“Sending notification
NO_PROPOSAL_CHOSEN to “IP address” 500, Oakley Transform [OAKLEY AES CBC (256), OAKLEY SHA1, OAKLEY GROUP MODP1024] refused due to strict flag, no acceptable Oakley Transform, responding to Main Mode.”


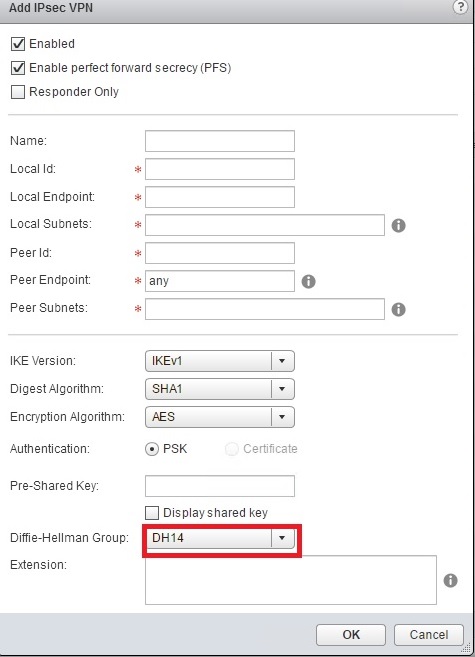
After investigating this internally with Engineering, we found out the reason for that is that NSX changed the default Diffie-Hellman to DH-14 from DH-2.

Diffie-Hellman is a protocol used as part of the negotiation for a secure connection

The change was made by the NSX team was obviously for security reasons. However, this change broke the IPSEC tunnels on the vCD edges that are not aware of the change due to the fact that 8.20 vCD has its own Database.


The temporary workaround?

To workaround the issue, the admin will have to change the DH manually from DH14 to DH2 from either NSX UI or the VCD UI noting that each time you do redeploy the vCD edge, you will have to change the DH to 2 as config will override based on the service config in the vCD database.

blog2_2Blog2_1


The Permanent Fix:

The permanent fix is in vCD 9.0 as NSX would be the source of truth in 9.0 even for non advanced edges. With 9.0, we don’t use the service config anymore and doing a redeploy will maintain the state the edge had in NSX.

If you can’t upgrade to vCD 9.0, you can request a hotpatch from GSS for 8.20 that will basically set the vCD edges to be DH2.


Important to note if you haven’t upgraded NSX yet:


If you are ready to upgrade NSX to 6.3+ and you are still on vCD 8.2, requesting and applying this vCD hot patch prior to the NSX upgrade will reduce downtimes and manual work.


Update From Engineering and GSS:

vCD version 8.20.0.3 will have the hot patch described above included. The release is still being tested with QA and will be be launched after it gets the green light from QA.

Comparing Centralized Firewalls to NSX Distributed Firewall DFW – The apples to oranges comparison

Solution Architects and often Security Engineers design Data Centers in a way that they can achieve the highest level of security with the highest performance possible . Often Firewalls are installed and configured to protect workloads from unauthorized access and comply with security policies. VMware introduced the NSX distributed firewall concept which changed the centralized mindset and raised the firewall component to a completely different level.

Although comparing the centralized to distributed firewalls Architecture and capabilities is like comparing apples to oranges, Architects and Network Admins would often request such a comparison to try visualize the new mindset VMware NSX DFW brought into the game.

In the next series of blogs I will show you how NSX DFW compare to the Traditional Centralized Firewalls (The apple to orange comparison). I will also share with you the best practices in achieving Line rate performance/throughput when using NSX DFW along with the results of the performance testings.

So how do Centralized and Distributed Firewalls compare?

Traditionally, Firewalls were centralized and are typically physical boxes that process the packets and take the “allow/drop” decisions based on pre-configured rules. Traffic will be typically hair-pinned to those Firewall boxes when being processed.

VMware NSX Distributed Firewall or often called DFW, introduced a new concept by Distributing the Firewall capability across all compute hypervisors without the need of making the traffic exit to another hop for the allow/drop traffic decision processing .

Traditional FWs will often need the packets sourced/destined to be filtered via the firewall box itself. Hence for large data centers, Firewall throughput is considered a key concern with respect to bottlenecks in the data processing. Scaling a centralized Firewall would often be challenging  whenever the datacenter traffic is exceeding the box’s limit. Network/Security Admins will need to purchase additional firewalls to cascade with the existing ones or often a rip and replace would be needed to accommodate the new demanding throughput needs. (yes

NSX DFW changes the concept of Centralized Firewall and introduced a new perception in the architectural design of Firewalls. With NSX DFW, the Security team can protect the workload at the Virtual Machine’s vNic level. By rules being processed at the vNic, decisions of allowing or dropping packets sourced from the DFW protected VMs is taken even before the packet exits the hypervisor the VM lives on.

Picture1

Traditional FW technologies are fixed based on initial purchase of technology (i.e. 40Gbps FW)

Compared to…

NSX which scales based on the amount of ESXi hosts which already exist in your environment running the VM workloads

Therefore, when we talk about scaling –

  • Traditional FW technologies will require a rip/replace or physical upgrade to mitigate any performance bottlenecks/hairpinning along with potential architecture redesign
  • Compared to VMware NSX which linearly adds performance as we add ESXi hosts to scale VM workloads… not to mention that the ESXI hosts already exist in your Data center (lower CAPEX)


as we addNSX performance scales

What is the most powerful differentiator? 

One of the most powerful features of NSX DFW in my opinion is the ability to create firewall rules based on static and dynamic membership criteria. Security groups construct is introduced which is an extremely efficient tool  to implement security policies or firewall rules based on those security groups defined. Security Groups can be leveraged to either create Static or Dynamic Inclusion based rules.

Static inclusion provides the capability to manually include particular objects into the security groups such as Specific Cluster, Logical Switch, vAPP, Data Center , IP Sets, Active Directory group, Mac Sets, Security tag, vNic, VM, Resource Pool and DVS Port Group.

5

Dynamic Inclusion would include Computer OS name, Computer Name, VM name, Security tag and Entity.

RDecker-3

For instance you can create a firewall rule that will allow HTTPS access to all VMs that have the word “web” in their VM name. Or perhaps create firewall rules based on Security tags where a tag can be associated with a specific tenant workloads in the Service Provider world.


Ofcourse, The FW rules configured move with the VM as it vMotions across NSX prepared hosts!


In Summary:


1

Traditional FW Technologies  

VMware NSX DFW


CLI-Centric FW Model Distributed at hypervisor level
Hair-pinning Mitigation of hair-pinning due to kernel-decision processing vs the centralized model
Static Configuration Dynamic, API based Configuration
IP Address-Based Rules Static and Dynamic Firewall constructs which includes VM Name, VC Objects and Identity-based Rules
Fixed Throughput per Appliance

(i.e. 40Gbps)

Line Rate ~ 20 Gbps per host (with 2 * 10 Gbps pNics).

~ 80 GBps per host (with 2 * 40 Gbps Nic Cards and MTU 8900).

Lack of visibility with encapsulated traffic Full Visibility to encapsulated traffic


In my next blogs, I will show you the testings made to the NSX DFW throughput and what are the best practices to achieve LINE-RATE performance.


 Big thank you to my peer Daniel Paluszek for motivating me to start blogging and for giving me feedback on this post. You can follow his amazing blog here